Experimental Programming Language and Win32 IDEIn 2008, I started to develop an experimental programming language, compiler and linker from scratch. Without using a third-party compiler, linker, assembler, library, etc. I completed it. I created the structure and the working principle in a unique way. So, it is a completely unique project. This project is a Win32 compiler, linker and a development environment at the same time.
I completely wrote the project in Assembly Language. So, the project size is only 53 kb and the default compiled exe size is 3 kb. The file size expands according to the code you write. My aim was not to develop a new language, product, etc. There is no need either. I just wanted to create an experimental project.
Important Update (2023)
I designed this project for the Turkish Language in the past and later I decided to translate it into the English language, completely. The whole programming language and UI are using English words now. The variable types like "sayı", "karakter" have become "number", "character". The component properties like "yazı", "boyut" have become "text", "size", etc. The commands, the events, everything is translated.
While I was translating the project, I didn't add something new but I fixed some minor bugs. It is still a very old project and I stopped working on it in 2010. I was using a 1024x768 monitor in these years.
 You can configure the form components as you like in the development environment. Expand, hide, etc. I also stored and read these in my own way. There is no resource section in the executable file.
Usage
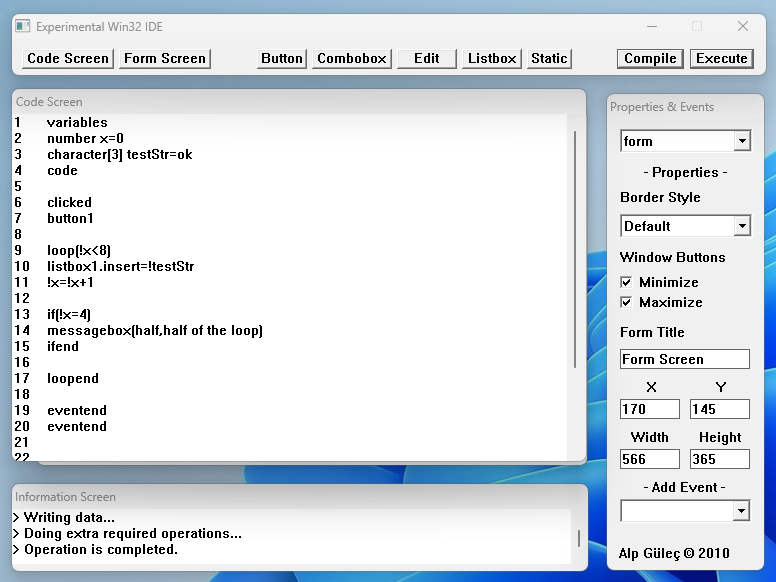
I added 5 different components for the interface.
"Button, combobox, edit, listbox and static."
You can add these components to the form by clicking the buttons on the top, you can adjust properties on the right screen. You can add events, as well.
In the lower part, there is an information screen. You can see incorrect lines of code and status from there.
The code screen and the form stand in back-to-back. You can easily switch using the buttons at the top.
And finally you can compile and run with the buttons on the top right.
You can configure the form components as you like in the development environment. Expand, hide, etc. I also stored and read these in my own way. There is no resource section in the executable file.
Usage
I added 5 different components for the interface.
"Button, combobox, edit, listbox and static."
You can add these components to the form by clicking the buttons on the top, you can adjust properties on the right screen. You can add events, as well.
In the lower part, there is an information screen. You can see incorrect lines of code and status from there.
The code screen and the form stand in back-to-back. You can easily switch using the buttons at the top.
And finally you can compile and run with the buttons on the top right.
 You can find the compiled executable file in the project folder.
Programming Language
Defining Variables:
There are two types of variables.
number and character
number:
number is a signed integer data type and it can store a 32 bit number.
Usage:
You can find the compiled executable file in the project folder.
Programming Language
Defining Variables:
There are two types of variables.
number and character
number:
number is a signed integer data type and it can store a 32 bit number.
Usage:
| 1 | number value | | 2 | number value=254 |
character:
character data type can store a character array.
Usage:
We defined str and initialized it with "test".
We use variables with exclamation(!) symbol.
| 1 | !value=4 | | 2 | !value=!othervalue |
and
You can make calculations.
Usage:
| 1 | !value=!value+1 | | 2 | !value=1+3*4/2 | | 3 | !value=!othervalue+2*5 |
You can also assign character variables to each other.
Components
There are 5 different components.
"Button, combobox, edit, listbox and static."
Warning: Component properties should not be changed in the main code block. Using events like "starting" (When the application is starting), "exiting" (When the application is exiting), "clicked", etc. is recommended. Otherwise, the code you have provided will update the component infinitely in the main window loop.
Wrong Usage (X):
| 1 | variables | | 2 | code | | 3 | button1.text=test | | 4 | end |
Correct Usage (✔):
| 1 | variables | | 2 | code | | 3 | starting | | 4 | button1.text=test | | 5 | eventend | | 6 | end |
Text changing
| 1 | button1.text=test | | 2 | button1.text=!variableText | | 3 | edit1.text=test | | 4 | edit1.text=!variableText |
Position adjustment
| 1 | button1.position(24,43) | | 2 | button1.position(!x,!y) |
Size adjustment
| 1 | button1.size(50,100) | | 2 | button1.size(!width,!height) |
Enable/Disabled
| 1 | button1.enabled | | 2 | button1.disabled |
Show/Hide
| 1 | button1.show | | 2 | button1.hide |
Add an element to the listbox
| 1 | listbox1.insert=test | | 2 | listbox1.insert=!variableText |
Add an element to the combobox
| 1 | combobox1.add=test | | 2 | combobox1.add=!variableText |
Delete an element from the listbox
Delete an element from the combobox
Other functions
Close:
Message Box:
| 1 | messagebox(title,text) | | 2 | messagebox(!variableTitle,!variableText) | | 3 | messagebox(test,!variableText) |
Events
When the program is starting:
| 1 | starting | | 2 | messagebox(test,test) | | 3 | eventend |
All events end with the "eventend" tag.
When the program is closing:
| 1 | exiting | | 2 | messagebox(test,text) | | 3 | eventend |
When a button component is clicked:
| 1 | clicked | | 2 | | | 3 | button1 | | 4 | exit | | 5 | eventend | | 6 | | | 7 | button2 | | 8 | messagebox(test,text) | | 9 | eventend | | 10 | | | 11 | eventend |
Usage:
When an edit component is changed:
| 1 | changed | | 2 | | | 3 | edit1 | | 4 | exit | | 5 | eventend | | 6 | | | 7 | edit2 | | 8 | messagebox(test,test) | | 9 | eventend | | 10 | | | 11 | eventend |
When a combobox component is selected:
| 1 | cbselected | | 2 | | | 3 | combobox1 | | 4 | exit | | 5 | eventend | | 6 | | | 7 | eventend |
When a listbox component is selected:
| 1 | lbselected | | 2 | | | 3 | listbox1 | | 4 | exit | | 5 | eventend | | 6 | | | 7 | eventend |
When a listbox component selection is changed:
| 1 | lbselectionchanged | | 2 | | | 3 | listbox1 | | 4 | exit | | 5 | eventend | | 6 | | | 7 | eventend |
Conditionals
You can compare variables, numbers, variable-numbers, etc.
>, <, >=, <=, =
You can use these operators for comparison.
Comparisons can be nested.
Usage:
| 1 | if(!abc>2) | | 2 | messagebox(test,test) | | 3 | ifend |
We use this tag for ending the comparison.
Loop
Usage:
| 1 | loop(!value<15) | | 2 | messagebox(test,test) | | 3 | !value=!value+1 | | 4 | loopend |
Nested loops can be used.
Functions
You can define your functions.
Usage:
| 1 | function testFunc | | 2 | !a=!a*2 | | 3 | !b=2+3+!a | | 4 | funcend |
We use this tag to end the function
We call the function by using this code.
Usage:
| 1 | fonksiyon testFunc | | 2 | !a=!a*2 | | 3 | !b=2+3+!a | | 4 | funcend | | 5 | | | 6 | ... | | 7 | | | 8 | call testFunc |
Error Messages
Variable block could not be found.
Code block could not be found.
Code block not closed.
The most primitive program block that can be
Variables block must take the first place.
Component could not be found: You must add the component you defined in the code.
There is an unclosed block: You must close a condition, loop or event, etc.
The programming language is processed line by line. Do not use unnecessary spaces in a single line.
Examples
Warning: There may be invisible spaces and characters in the copied and pasted example code.
Program1:
At first, place two buttons on the form.
Code:
| 1 | variables | | 2 | character[10] title=test | | 3 | character[15] text=test2 | | 4 | code | | 5 | | | 6 | clicked | | 7 | button1 | | 8 | messagebox(!title,!text) | | 9 | eventend | | 10 | button2 | | 11 | exit | | 12 | eventend | | 13 | eventend | | 14 | | | 15 | end |
Program2:
Place one button on the form.
Code:
| 1 | variables | | 2 | number !x=0 | | 3 | number !y=0 | | 4 | code | | 5 | | | 6 | clicked | | 7 | button1 | | 8 | | | 9 | loop(!x<200) | | 10 | button1.position(!x,!y) | | 11 | !x=!x+1 | | 12 | !y=!y+1 | | 13 | loopend | | 14 | | | 15 | eventend | | 16 | eventend | | 17 | | | 18 | end |
Program3:
Place one button and one listbox on the form.
Code:
| 1 | variables | | 2 | number x=0 | | 3 | character[3] str=ok | | 4 | code | | 5 | | | 6 | clicked | | 7 | button1 | | 8 | | | 9 | loop(!x<8) | | 10 | listbox1.insert=!str | | 11 | !x=!x+1 | | 12 | | | 13 | if(!x=4) | | 14 | messagebox(half,half of the loop) | | 15 | ifend | | 16 | | | 17 | loopend | | 18 | | | 19 | eventend | | 20 | eventend | | 21 | | | 22 | starting | | 23 | messagebox(hello,hello) | | 24 | eventend | | 25 | | | 26 | exiting | | 27 | messagebox(bye,bye) | | 28 | eventend | | 29 | end |
|
